Ihr Warenkorb ist leer


After hiking for the day nearly everything tastes good, but the healthier you feed yourself the better you’ll feel and perform. It’s important to provide your body with sufficient energy and nutrients. Relying exclusively on store-bought backpacking meals won’t tick all the nutritional boxes, can get rather boring and cost a small fortune.
If you want to avoid flavour enhancers or have a specific dietary requirement, then making your own hiking meals is really the best option. Nothing compares to home cooking! With the right equipment, plus a few important tips and creative hacks you can take your favourite home cooked meals on the trail. After the meals are vacuum sealed, they’ll be light weight, space-efficient, and have a long shelf-life without the need for preservatives.
Dehydrating your own backpacking meals allows you to control the final product and gives you endless recipe options. You have full control over what goes in. Less salt, more protein, gluten-free? The drying process slowly removes moisture while retaining the nutrients and flavour. If you can cook a basic curry, stew, rice or pasta dish, you can create a dehydrated meal! Get lots of dehydrating info here.
There are two main approaches to dehydrating hiking meals. The first is to cook and dehydrate ingredients separately. You’ll find this recipe index a great resource. For efficiency, consider dehydrating a variety of foods at the same time, so long as they require the same drying temperature. Once you have a variety of dried ingredients, you can assemble them into meals. The second is to dehydrate whole home cooked meals. This minimises prep time even further and allows flavours to meld and taste just like home.

With a few simple tweaks to a recipe, you can easily create a shelf staple backpacking meal.
AVOID DEHYDRATING THESE INGREDIENTS
Shellfish, eggs, dairy, fatty meats, oils and fats.
Fat does not dehydrate and will go rancid. If your meal has too much fat, it will create a coating that seals in moisture during dehydration, which will turn rancid over time and really taste terrible.
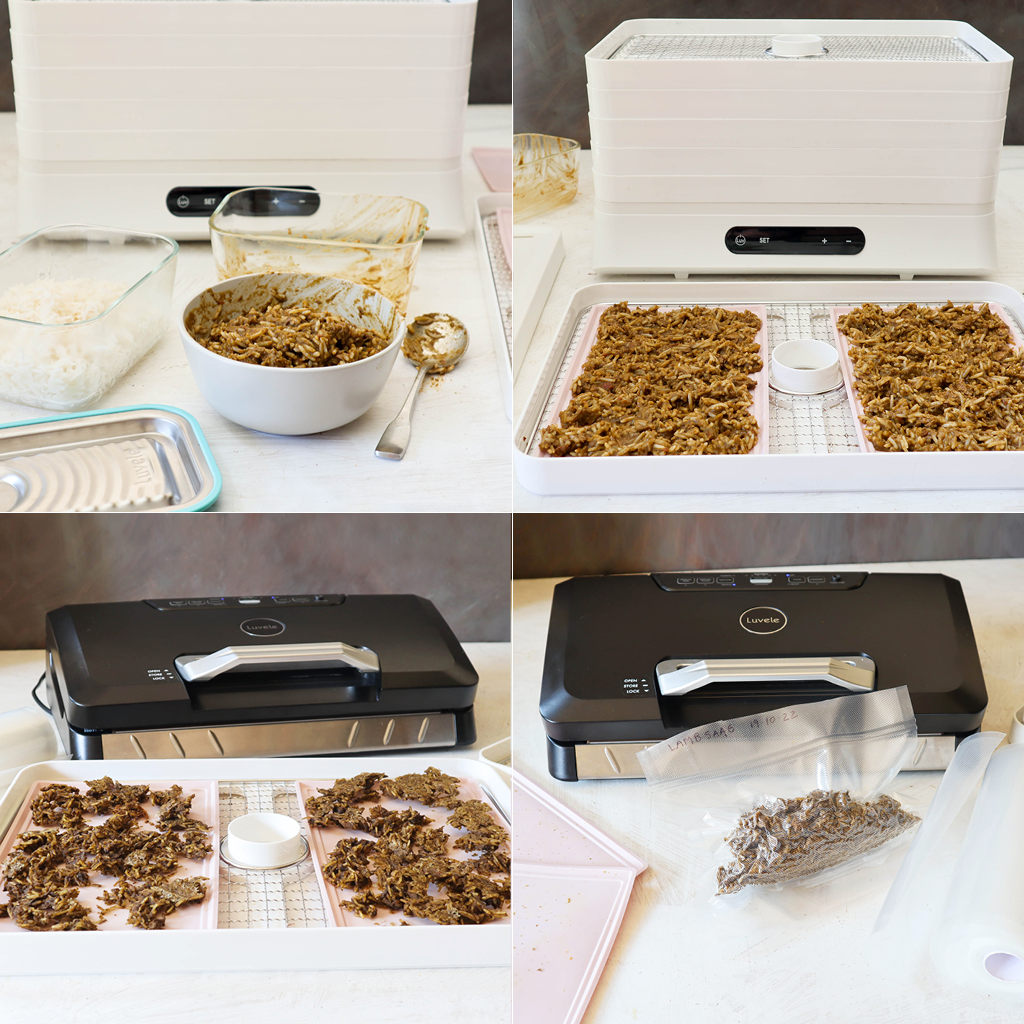
Divide the cooked meal into portions before you dehydrate it. This is essential! Once dehydrated it is very difficult to portion control. You don’t want to be hungry or carry more than you need to.
If weight and carrying water is a concern, weigh each portion to get the ‘wet weight’. Then once dehydrated, weigh the dried portion. This is your ‘dry weight’. Subtract this amount from your wet weight to know how much water to add when cooking.

Get creative and try different flavour combinations. Once you have dehydrated ingredients, there are endless meals you can come up with, which means a more tasty and varied eating experience out on the trail. You can combine your home prepared dehydrated ingredients or meals with store-bought ingredients for even more variety.
Boost flavour and expand your backpacking menu with these homemade and store bought dried foods:
Homemade dehydrated chicken broth (or use commercial bullion or stock powder)
Homemade vegetable stock powder (or use commercial bullion or stock powder)
Sliced dried mushroom, shitake or mushroom powder
Dried or freeze-dried bean curd or tofu (Asian supermarket)
Tomato powder or dried tomatoes
Dried peas
Seaweed (Asian supermarkets)
Dried shrimp (Asian supermarkets)
Dried pork crackling (Asian supermarkets)
Shelf stable parmesan
Coconut milk powder
Milk powder
Homemade protein powder
Fried shallots (Asian supermarkets)
Dried miso (Asian supermarkets)
Jerky or biltong
Oats and instant oatmeal
Super greens powder
Homemade garlic powder or onion powder
Dried fresh herbs and spices.
Curry powder, taco mix, Pho spices or make your own spice blend
Tuna or salmon sachets (not tins)
Dehydrate your favourite sauces or take small sachets
Small sachets or squeezable butter, coconut oil, olive oil
Precooked and dehydrated, couscous, rice, quinoa, pasta, ramen, noodles, barley
Precooked or tinned dehydrated lentils and beans
Dehydrated vegetables – find most vegetables here
Nuts, seeds and trail mixes
Travel packets of soy sauce, jam, mayonnaise, butter, honey
Powdered egg
Muesli bars, fat bombs, protein bars
Granola and muesli
Dehydrated fruit rollups and fruit snacks – find many here
Crackers
Instant sauces and soup mixes
Custard powder, cacao powder
Tortillas and wraps

Properly dehydrated and vacuum-sealed meals are light weight, compact, low-odour and last for months stored in a cool dark place, or longer in the freezer. The Luvele vacuum sealer bags are durable enough to hold boiling water, becoming the perfect vessel for reconstituting a single-serve meal.
Label the outside of the bag with the type of meal and the amount of water needed to rehydrate (optional).
Pasta, noodles or other sharp dried ingredients can pierce holes in vacuum-seal bags and allow oxygen to cause spoilage. As a precaution, you can add a layer of baking paper between the food and plastic before sealing.

If you skipped weighing your portions, dehydrated meals generally require equal parts water to food and about 15–25 minutes to reconstitute. You can rehydrate your meal in the vacuum seal bag or in a pot, cup or bowl. Bring water to a boil. Pour in the boiling water. Stir thoroughly with a spoon (no sharps) to evenly distribute and moisten the contents. Cover the pot/container or fold the top of the plastic and seal with a peg until the food is tender and fully rehydrated. A pot cosy (insulated sleeve) helps retain the heat while your food rehydrates.


